婆罗门
精华
|
战斗力 鹅
|
回帖 0
注册时间 2012-8-5
|
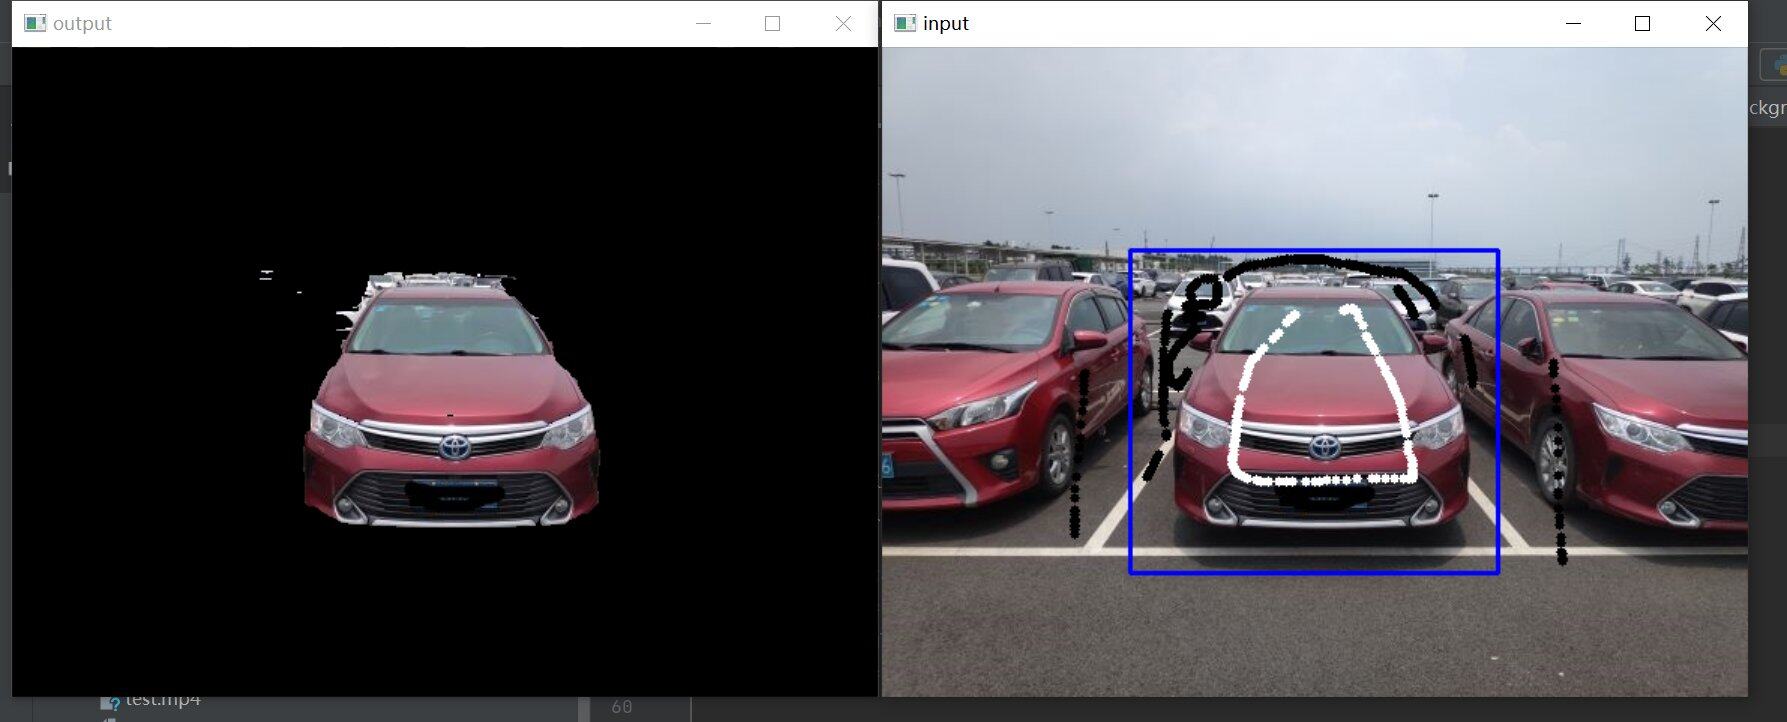
以前看到的基于python 的opencv的Grabcut。
大概效果也就这个程度:
- #!/usr/bin/env python
- '''
- ===============================================================================
- Interactive Image Segmentation using GrabCut algorithm.
- This sample shows interactive image segmentation using grabcut algorithm.
- USAGE:
- python grabcut.py <filename>
- README FIRST:
- Two windows will show up, one for input and one for output.
- At first, in input window, draw a rectangle around the object using
- mouse right button. Then press 'n' to segment the object (once or a few times)
- For any finer touch-ups, you can press any of the keys below and draw lines on
- the areas you want. Then again press 'n' for updating the output.
- Key '0' - To select areas of sure background
- Key '1' - To select areas of sure foreground
- Key '2' - To select areas of probable background
- Key '3' - To select areas of probable foreground
- Key 'n' - To update the segmentation
- Key 'r' - To reset the setup
- Key 's' - To save the results
- ===============================================================================
- '''
- # Python 2/3 compatibility
- from __future__ import print_function
- import numpy as np
- import cv2
- import sys
- import tkinter as tk
- from tkinter import filedialog
- BLUE = [255,0,0] # rectangle color
- RED = [0,0,255] # PR BG
- GREEN = [0,255,0] # PR FG
- BLACK = [0,0,0] # sure BG
- WHITE = [255,255,255] # sure FG
- DRAW_BG = {'color' : BLACK, 'val' : 0}
- DRAW_FG = {'color' : WHITE, 'val' : 1}
- DRAW_PR_FG = {'color' : GREEN, 'val' : 3}
- DRAW_PR_BG = {'color' : RED, 'val' : 2}
- # setting up flags
- rect = (0,0,1,1)
- drawing = False # flag for drawing curves
- rectangle = False # flag for drawing rect
- rect_over = False # flag to check if rect drawn
- rect_or_mask = 100 # flag for selecting rect or mask mode
- value = DRAW_FG # drawing initialized to FG
- thickness = 3 # brush thickness
- def onmouse(event,x,y,flags,param):
- global img,img2,drawing,value,mask,rectangle,rect,rect_or_mask,ix,iy,rect_over
- # Draw Rectangle
- if event == cv2.EVENT_RBUTTONDOWN:
- rectangle = True
- ix,iy = x,y
- elif event == cv2.EVENT_MOUSEMOVE:
- if rectangle == True:
- img = img2.copy()
- cv2.rectangle(img,(ix,iy),(x,y),BLUE,2)
- rect = (min(ix,x),min(iy,y),abs(ix-x),abs(iy-y))
- rect_or_mask = 0
- elif event == cv2.EVENT_RBUTTONUP:
- rectangle = False
- rect_over = True
- cv2.rectangle(img,(ix,iy),(x,y),BLUE,2)
- rect = (min(ix,x),min(iy,y),abs(ix-x),abs(iy-y))
- rect_or_mask = 0
- print(" Now press the key 'n' a few times until no further change \n")
- # draw touchup curves
- if event == cv2.EVENT_LBUTTONDOWN:
- if rect_over == False:
- print("first draw rectangle \n")
- else:
- drawing = True
- cv2.circle(img,(x,y),thickness,value['color'],-1)
- cv2.circle(mask,(x,y),thickness,value['val'],-1)
- elif event == cv2.EVENT_MOUSEMOVE:
- if drawing == True:
- cv2.circle(img,(x,y),thickness,value['color'],-1)
- cv2.circle(mask,(x,y),thickness,value['val'],-1)
- elif event == cv2.EVENT_LBUTTONUP:
- if drawing == True:
- drawing = False
- cv2.circle(img,(x,y),thickness,value['color'],-1)
- cv2.circle(mask,(x,y),thickness,value['val'],-1)
- if __name__ == '__main__':
- # print documentation
- print(__doc__)
- # Loading images
- ftypes = [
- ("图像文件", "*.jpg; *.jpeg; *.png")
- ]
- root = tk.Tk()
- root.withdraw()
- filename = filedialog.askopenfilename(filetypes=ftypes)
- img = cv2.imread(filename)
- img2 = img.copy() # a copy of original image
- mask = np.zeros(img.shape[:2],dtype = np.uint8) # mask initialized to PR_BG
- output = np.zeros(img.shape,np.uint8) # output image to be shown
- # input and output windows
- cv2.namedWindow('output')
- cv2.namedWindow('input')
- cv2.setMouseCallback('input',onmouse)
- cv2.moveWindow('input',img.shape[1]+10,90)
- print(" Instructions: \n")
- print(" Draw a rectangle around the object using right mouse button \n")
- while(1):
- cv2.imshow('output',output)
- cv2.imshow('input',img)
- k = cv2.waitKey(1)
- # key bindings
- if k == 27: # esc to exit
- break
- elif k == ord('0'): # BG drawing
- print(" mark background regions with left mouse button \n")
- value = DRAW_BG
- elif k == ord('1'): # FG drawing
- print(" mark foreground regions with left mouse button \n")
- value = DRAW_FG
- elif k == ord('2'): # PR_BG drawing
- value = DRAW_PR_BG
- elif k == ord('3'): # PR_FG drawing
- value = DRAW_PR_FG
- elif k == ord('s'): # save image
- bar = np.zeros((img.shape[0],5,3),np.uint8)
- res = np.hstack((img2,bar,img,bar,output))
- cv2.imwrite('grabcut_output.png',res)
- print(" Result saved as image \n")
- elif k == ord('r'): # reset everything
- print("resetting \n")
- rect = (0,0,1,1)
- drawing = False
- rectangle = False
- rect_or_mask = 100
- rect_over = False
- value = DRAW_FG
- img = img2.copy()
- mask = np.zeros(img.shape[:2],dtype = np.uint8) # mask initialized to PR_BG
- output = np.zeros(img.shape,np.uint8) # output image to be shown
- elif k == ord('n'): # segment the image
- print(""" For finer touchups, mark foreground and background after pressing keys 0-3
- and again press 'n' \n""")
- if (rect_or_mask == 0): # grabcut with rect
- bgdmodel = np.zeros((1,65),np.float64)
- fgdmodel = np.zeros((1,65),np.float64)
- cv2.grabCut(img2,mask,rect,bgdmodel,fgdmodel,10,cv2.GC_INIT_WITH_RECT)
- rect_or_mask = 1
- elif rect_or_mask == 1: # grabcut with mask
- bgdmodel = np.zeros((1,65),np.float64)
- fgdmodel = np.zeros((1,65),np.float64)
- cv2.grabCut(img2,mask,rect,bgdmodel,fgdmodel,5,cv2.GC_INIT_WITH_MASK)
- mask2 = np.where((mask==1) + (mask==3),255,0).astype('uint8')
- output = cv2.bitwise_and(img2,img2,mask=mask2)
- cv2.destroyAllWindows()
|
-

|
![]() 沪公网安备 31010702007642号 )
沪公网安备 31010702007642号 )